OK, so I'm finding getting time difficult. Prioritising gaming before admin, naughty naughty.
So I'll do a quick JOOMLA write up on how to modify the Squad page on the GRRR main page. Hopefully that will give you a basic understanding of joomla.
Firstly, understand that Joomla is a content management system. Content made up of ARTICLES. There is also a hierarchy, Starting with Sections, then sections divided into Categories and then the Articles within those Categories.
In this example, the SQUAD page is in the GRRRINFO section, with the General GRRR category, the page made from the GRRR SQUAD article.
So let’s run through logging in and editing the GRRR SQUAD article.
Firstly open
http://grrr.co.za/administrator/index.php
Login with username: admin
Password: Titp4su
Then click on Login button
You will be presented with the Joomla Admin page, we are going to edit the GRRR SQUAD article, to get there click on the ARTICLE MANAGER:

You will need to scroll down to click on the GRRR SQUAD Article to edit it:

This is the screen you will now see, with a MS-WORD-LIKE editor (You can actually write a word document and copy-paste into this and it will create the formatting automagically, like bolding, fonts etc, most of the time.)

On our squad page, we have BF2Player sigs, and the hyperlinks take you to the bf2s profiles. First we’ll need to get the BF2Tracker image from, yes you guessed it, bf2player.com. You click on the BF2 section and select BF2 Signature and then search for Bloed_Lus like so:

Once you open Bload_Lus signature, scroll down to the Complex Signature, which is the one we’ve used for all of our others.
Now there are a few ways to do this, I like to copy and paste the link into notepad to make life easier later. So here’s how I do it:
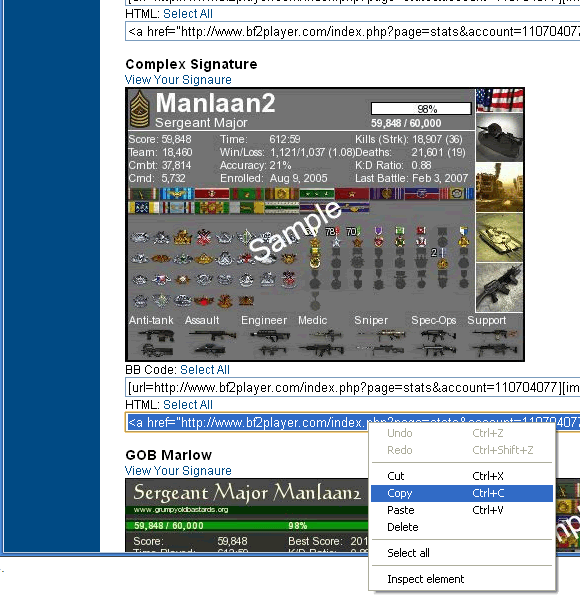
Select the HTML code and copy it

Paste the HTML code into Notepad
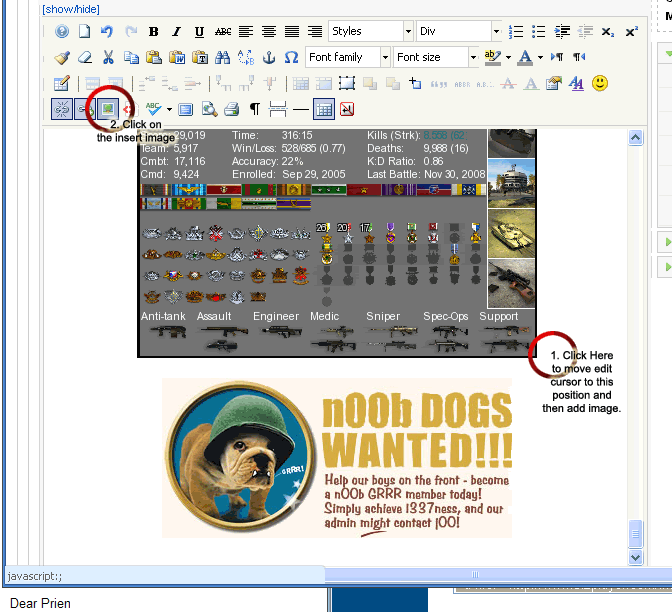
Now that I have the HTML code for the Signature, it’s time to go back to the Joomla Article to edit.
We will then scroll down to the end, since we want to add Bloed_Lus to our squad page, we will click just to the bottom right of the last image and then click insert image like so:
A LOAD-IN-WINDOW loads up so that you an insert images, I’m going to link the image to BF2Tracker sig:
1. First copy the Image URL from Notepad:

2. Now Paste this into the Insert Image applet: URL box and click the INSERT button

You will be greeted with a confirmation screen if you don’t add Alternative Text (when you hover over the image, display text), just click YES:

You’re not done yet! The image has been inserted, but the hyperlink goes somewhere else, click on the image (once it loads), then RIGHT-CLICK it to drop down a menu to select INSERT/EDIT LINK, this will edit the hyperlink (where you go if you click on the image):

Now edit the Hyperlink URL to point it to the correct BF2s URL for Bload_Lus’ profile and click on UPDATE.

That’s it, the signature and link are both correct, time to save the article and go check that it works! Scroll up and click SAVE:

Hope this helps you all.
Lee
OK, so I'm finding getting time difficult. Prioritising gaming before admin, naughty naughty.
So I'll do a quick JOOMLA write up on how to modify the Squad page on the GRRR main page. Hopefully that will give you a basic understanding of joomla.
Firstly, understand that Joomla is a content management system. Content made up of ARTICLES. There is also a hierarchy, Starting with Sections, then sections divided into Categories and then the Articles within those Categories.
In this example, the SQUAD page is in the GRRRINFO section, with the General GRRR category, the page made from the GRRR SQUAD article.
So let’s run through logging in and editing the GRRR SQUAD article.
Firstly open [url]http://grrr.co.za/administrator/index.php[/url]
[img]http://i228.photobucket.com/albums/ee8/leelo0270/joomlalogin.gif[/img]
Login with username: admin
Password: Titp4su
Then click on Login button
You will be presented with the Joomla Admin page, we are going to edit the GRRR SQUAD article, to get there click on the ARTICLE MANAGER:
[img]http://i228.photobucket.com/albums/ee8/leelo0270/articlemanager.gif[/img]
You will need to scroll down to click on the GRRR SQUAD Article to edit it:
[img]http://i228.photobucket.com/albums/ee8/leelo0270/articleselect.gif[/img]
This is the screen you will now see, with a MS-WORD-LIKE editor (You can actually write a word document and copy-paste into this and it will create the formatting automagically, like bolding, fonts etc, most of the time.)
[img]http://i228.photobucket.com/albums/ee8/leelo0270/editarticle.gif[/img]
On our squad page, we have BF2Player sigs, and the hyperlinks take you to the bf2s profiles. First we’ll need to get the BF2Tracker image from, yes you guessed it, bf2player.com. You click on the BF2 section and select BF2 Signature and then search for Bloed_Lus like so:
[img]http://i228.photobucket.com/albums/ee8/leelo0270/bf2tracksearch.gif[/img]
Once you open Bload_Lus signature, scroll down to the Complex Signature, which is the one we’ve used for all of our others.
Now there are a few ways to do this, I like to copy and paste the link into notepad to make life easier later. So here’s how I do it:
[img]http://i228.photobucket.com/albums/ee8/leelo0270/selecthtml.gif[/img]
Select the HTML code and copy it
[img]http://i228.photobucket.com/albums/ee8/leelo0270/apstetonotepad.gif[/img]
Paste the HTML code into Notepad
Now that I have the HTML code for the Signature, it’s time to go back to the Joomla Article to edit.
We will then scroll down to the end, since we want to add Bloed_Lus to our squad page, we will click just to the bottom right of the last image and then click insert image like so:
[img]http://i228.photobucket.com/albums/ee8/leelo0270/insertimage.gif[/img]
A LOAD-IN-WINDOW loads up so that you an insert images, I’m going to link the image to BF2Tracker sig:
1. First copy the Image URL from Notepad:
[img]http://i228.photobucket.com/albums/ee8/leelo0270/copyimageurl.gif[/img]
2. Now Paste this into the Insert Image applet: URL box and click the INSERT button
[img]http://i228.photobucket.com/albums/ee8/leelo0270/pasteurl.gif[/img]
You will be greeted with a confirmation screen if you don’t add Alternative Text (when you hover over the image, display text), just click YES:
[img]http://i228.photobucket.com/albums/ee8/leelo0270/confirm.gif[/img]
You’re not done yet! The image has been inserted, but the hyperlink goes somewhere else, click on the image (once it loads), then RIGHT-CLICK it to drop down a menu to select INSERT/EDIT LINK, this will edit the hyperlink (where you go if you click on the image):
[img]http://i228.photobucket.com/albums/ee8/leelo0270/edithyperlink.gif[/img]
Now edit the Hyperlink URL to point it to the correct BF2s URL for Bload_Lus’ profile and click on UPDATE.
[img]http://i228.photobucket.com/albums/ee8/leelo0270/pasteplayerid.gif[/img]
That’s it, the signature and link are both correct, time to save the article and go check that it works! Scroll up and click SAVE:
[img]http://i228.photobucket.com/albums/ee8/leelo0270/saveupdates.gif[/img]
Hope this helps you all.
Lee